
JAM

This is default featured post 1 title

Go to Blogger edit html and find these sentences.Now replace these sentences with your own descriptions.This theme is Bloggerized by Lasantha Bandara - Premiumbloggertemplates.com.

This is default featured post 2 title

Go to Blogger edit html and find these sentences.Now replace these sentences with your own descriptions.This theme is Bloggerized by Lasantha Bandara - Premiumbloggertemplates.com.

This is default featured post 3 title

Go to Blogger edit html and find these sentences.Now replace these sentences with your own descriptions.This theme is Bloggerized by Lasantha Bandara - Premiumbloggertemplates.com.

This is default featured post 4 title

Go to Blogger edit html and find these sentences.Now replace these sentences with your own descriptions.This theme is Bloggerized by Lasantha Bandara - Premiumbloggertemplates.com.

This is default featured post 5 title

Go to Blogger edit html and find these sentences.Now replace these sentences with your own descriptions.This theme is Bloggerized by Lasantha Bandara - Premiumbloggertemplates.com.

Tampilkan postingan dengan label tips dan trik komputerisasi. Tampilkan semua postingan

Kamis, 15 Desember 2011

Cara membuat sistem restore pada windows 7

Membuat sistem restore di windows 7

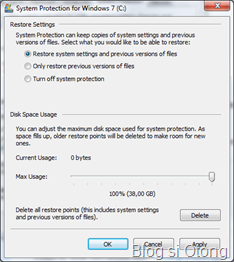
Berbeda dengan system restore pada Windows XP yang hanya merestore system max sebanyak 12% dari jumlah space tiap-tiap drive. Sedangkan untuk Windows 7, kita dapat merestore system sampai 100% kapasitas tiap-tiap drive.
image

Pada windows 7 selain kita bisa menonaktifkan system restore untuk drive selain drive C, kita juga bisa menonaktifkan Drive C itu sendiri. Berarti jika kita tidak mengaktifkan system restore di tiap-tiap drive, maka kita tidak memiliki backup system secara otomatis.
Baiklah, langsung ke permasalahan. Ikuti langkah berikut untuk membuat System Restore pada Windows 7 :
  • Windows Explorer
image
  • Klik kanan > Properties, pada Computer
image
  • Pada sidebar kiri, pilih “System protection”
image
  • Lakukan pengecekan apakah tiap-tiap drive sudah di protec. Jika sudah langsung klik tombol “Create…”
image
  • Masukan nama Restore point
image
  • Lalu Create
image
  • Tunggu sampai selesai, jika sudah selesai maka akan muncul pesan :
image
  • Akhiri dengan “Close”
Maka sekarang kita memiliki system restore yang siap digunakan disaat yang diperlukan.


Share

Twitter Delicious Facebook Digg Stumbleupon Favorites